Getting Started
What follows are some guides how to start the pykms_Server.py script, which provides the emulated server.
Running as a service
You can simply manage a daemon that runs as a background process. This can be achieved by using any of the notes below or by writing your own solution.
Docker


If you wish to get py-kms just up and running without installing any dependencies or writing own scripts: Just use Docker ! Docker also solves problems regarding the explicit IPv4 and IPv6 usage (it just supports both). The following command will download, “install” and start py-kms and also keep it alive after any service disruption.
docker run -d --name py-kms --restart always -p 1688:1688 -v /etc/localtime:/etc/localtime:ro ghcr.io/py-kms-organization/py-kms
If you just want to use the image and don’t want to build them yourself, you can always use the official image at the GitHub Container Registry (ghcr.io/py-kms-organization/py-kms). To ensure that you are using always the latest version you should check something like watchtower out!
Tags
There are currently three tags of the image available (select one just by appending :<tag> to the image from above):
latest, currently the same likeminimal.minimal, which is based on the python3 minimal configuration of py-kms. This tag does NOT includesqlitesupport !python3, which is fully configurable and equipped withsqlitesupport and a web-interface (make sure to expose port8080) for management.
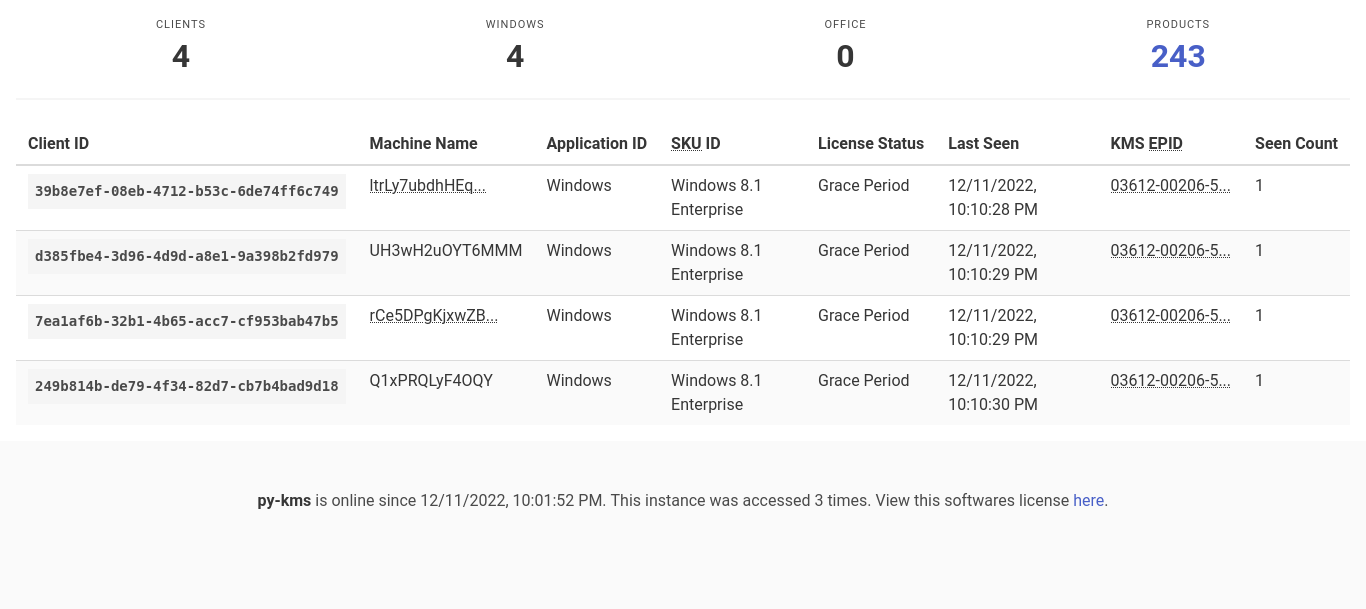
Wait… Web-interface? Yes! py-kms now comes with a simple web-ui to let you browse the known clients or its supported products. In case you wonder, here is a screenshot of the web-ui (note that this screenshot may not reflect the current state of the ui):
Architectures
There are currently the following architectures available (if you need an other, feel free to open an issue):
amd64arm32v6Raspberry PI 1 (A, A+, B, B+, Zero)arm32v7Raspberry PI 2 (B)arm64v8Raspberry PI 2 (B v1.2), Raspberry PI 3 (A+, B, B+), Raspberry PI 4 (B)
Please note that any architecture other than the classic amd64 is slightly bigger (~4 MB), caused by the use of qemu during building.
Docker Compose
You can use docker-compose instead of building and running the Dockerfile, so you do not need to respecify your settings again and again. The following Docker Compose file will deploy the latest image with the log into your local directory.
Make sure to take a look into the entrypoint.py script to see all supported variable mappings!
version: '3'

services:
  kms:
    image: ghcr.io/py-kms-organization/py-kms:python3
    ports:
      - 1688:1688 # kms
      - 8080:8080 # web-interface
    environment:
      IP: "::"
      HWID: RANDOM
      LOGLEVEL: INFO
    restart: always
    volumes:
      - ./db:/home/py-kms/db
      - /etc/localtime:/etc/localtime:ro
Parameters
Below is a little bit more extended run command, detailing all the different supported environment variables to set. For further reference see the start parameters for the docker environment.
docker run -it -d --name py3-kms \
    -p 8080:8080 \
    -p 1688:1688 \
    -v /etc/localtime:/etc/localtime:ro \
    --restart unless-stopped ghcr.io/py-kms-organization/py-kms:[TAG]
You can omit the -p 8080:8080 option if you plan to use the minimal or latest image, which does not include the sqlite module support.
Systemd
If you are running a Linux distro using systemd, create the file: sudo nano /etc/systemd/system/py3-kms.service, then add the following (change it where needed) and save:
[Unit]
Description=py3-kms
After=network.target
StartLimitIntervalSec=0

[Service]
Type=simple
Restart=always
RestartSec=1
KillMode=process
User=root
ExecStart=/usr/bin/python3 </path/to/your/pykms/files/folder>/py-kms/pykms_Server.py :: 1688 -V DEBUG -F </path/to/your/log/files/folder>/pykms_logserver.log

[Install]
WantedBy=multi-user.target
Check syntax with sudo systemd-analyze verify py3-kms.service, correct file permission (if needed) sudo chmod 644 /etc/systemd/system/py3-kms.service, then reload systemd manager configuration sudo systemctl daemon-reload,
start the daemon sudo systemctl start py3-kms.service and view its status sudo systemctl status py3-kms.service. Check if daemon is correctly running with cat </path/to/your/log/files/folder>/pykms_logserver.log. Finally a
few generic commands useful for interact with your daemon here.
Upstart (deprecated)
If you are running a Linux distro using upstart (deprecated), create the file: sudo nano /etc/init/py3-kms.conf, then add the following (change it where needed) and save:
description "py3-kms"
author "SystemRage"
env PYTHONPATH=/usr/bin
env PYKMSPATH=</path/to/your/pykms/files/folder>/py-kms
env LOGPATH=</path/to/your/log/files/folder>/pykms_logserver.log
start on runlevel [2345]
stop on runlevel [016]
exec $PYTHONPATH/python3 $PYKMSPATH/pykms_Server.py :: 1688 -V DEBUG -F $LOGPATH
respawn
Check syntax with sudo init-checkconf -d /etc/init/py3-kms.conf, then reload upstart to recognise this process sudo initctl reload-configuration. Now start the service sudo start py3-kms, and you can see the logfile
stating that your daemon is running: cat </path/to/your/log/files/folder>/pykms_logserver.log. Finally a few generic commands useful for interact with your daemon here.
Windows
If you are using Windows, to run pykms_Server.py as service you need to install pywin32, then you can create a file for example named kms-winservice.py and put into it this code:
import win32serviceutil
import win32service
import win32event
import servicemanager
import socket
import subprocess

class AppServerSvc (win32serviceutil.ServiceFramework):
    _svc_name_ = "py-kms"
    _svc_display_name_ = "py-kms"
    _proc = None
    _cmd = ["C:\Windows\Python27\python.exe", "C:\Windows\Python27\py-kms\pykms_Server.py"] # UPDATE THIS - because Python 2.7 is end of life and you will use other parameters anyway

    def __init__(self,args):
        win32serviceutil.ServiceFramework.__init__(self,args)
        self.hWaitStop = win32event.CreateEvent(None,0,0,None)
        socket.setdefaulttimeout(60)

    def SvcStop(self):
        self.killproc()
        self.ReportServiceStatus(win32service.SERVICE_STOP_PENDING)
        win32event.SetEvent(self.hWaitStop)

    def SvcDoRun(self):
        servicemanager.LogMsg(servicemanager.EVENTLOG_INFORMATION_TYPE,
                              servicemanager.PYS_SERVICE_STARTED,
                              (self._svc_name_,''))
        self.main()

    def main(self):
        self._proc = subprocess.Popen(self._cmd)
        self._proc.wait()

    def killproc(self):
        self._proc.kill()

if __name__ == '__main__':
    win32serviceutil.HandleCommandLine(AppServerSvc)
Now in a command prompt type C:\Windows\Python27\python.exe kms-winservice.py install to install the service. Display all the services with services.msc and find the service associated with py-kms, change the startup type
from manual to auto. Finally Start the service. If this approach fails, you can try to use Non-Sucking Service Manager or Task Scheduler as described here.
Other Platforms
They might be useful to you:
Manual Execution
Dependencies
Python 3.x.
If the
tzlocalmodule is installed, the “Request Time” in the verbose output will be converted into local time. Otherwise, it will be in UTC.It can use the
sqlite3module, storing activation data in a database so it can be recalled again.Installation example on Ubuntu / Mint (
requirements.txtis from the sources):sudo apt-get updatesudo apt-get install python3-pippip3 install -r requirements.txt(on Ubuntu Server 22, you’ll needpysqlite3-binary- see this issue)
Startup
A Linux user with ip addr command can get his KMS IP (Windows users can try ipconfig /all).
user@host ~ $ ip addr
1: lo: <LOOPBACK,UP,LOWER_UP> mtu 65536 qdisc noqueue state UNKNOWN group default qlen 1000
    link/loopback 00:00:00:00:00:00 brd 00:00:00:00:00:00
    inet 127.0.0.1/8 scope host lo
       valid_lft forever preferred_lft forever
    inet6 ::1/128 scope host
       valid_lft forever preferred_lft forever
2: enp6s0: <BROADCAST,MULTICAST,UP,LOWER_UP> mtu 1500 qdisc fq_codel state UP group default qlen 1000
    link/ether **:**:**:**:**:** brd ff:ff:ff:ff:ff:ff
    inet 192.168.1.102/24 brd 192.168.1.255 scope global dynamic noprefixroute enp6s0
       valid_lft 860084sec preferred_lft 860084sec
    inet6 ****:****:****:****:****:****:****:****/64 scope global dynamic noprefixroute
       valid_lft 6653sec preferred_lft 3052sec
    inet6 ****::****:****:****:****/64 scope link noprefixroute
       valid_lft forever preferred_lft forever
In the example above is 192.168.1.102 the ip we want to listen on, so it is this command (note you can omit the ip AND port specification if you just wish to listen on all interfaces with port 1688):
user@host ~/path/to/folder/py-kms $ python3 pykms_Server.py 192.168.1.102 1688
To stop pykms_Server.py, in the same bash window where code running, simply press CTRL+C.
Alternatively, in a new bash window, use kill <pid> command (you can type ps aux first and have the process killall <name_of_server>.
Web-Interface
As you may have noticed, the Docker container contains a web-interface, replacing the old GUI. If you want to launch it manually, checkout this issue discussion to learn more.
Quick Guide
The following are just some brief notes about parameters handling. For a more detailed description see here.
To generate a random HWID use
-woption:python3 pykms_Server.py -w RANDOM.To get the HWID from any server use the client, for example type:
python3 pykms_Client.py :: 1688 -m Windows8.1 -V INFO.To change your logfile path use
-Foption, for example:python3 pykms_Server.py -F /path/to/your/logfile.log -V DEBUG.To view a minimal set of logging information use
-V MININFOoption, for example:python3 pykms_Server.py -F /path/to/your/logfile.log -V MININFO.To redirect logging on stdout use
-F STDOUToption, for example:python3 pykms_Server.py -F STDOUT -V DEBUG.You can create logfile and view logging information on stdout at the same time with
-F FILESTDOUToption, for example:python3 pykms_Server.py -F FILESTDOUT /path/to/your/logfile.log -V DEBUG.With
-F STDOUTOFFyou disable all stdout messages (but a logfile will be created), for example:python3 pykms_Server.py -F STDOUTOFF /path/to/your/logfile.log -V DEBUG.With
-F FILEOFFyou disable logfile creation.Select timeout (seconds) for py-kms with
-t0option, for examplepython3 pykms_Server.py -t0 10.Option
-yenables printing asynchronously of messages (pretty / logging).